
Did you know that chicken and gravy recipes are searched over 60,000 times monthly, making it one of America’s most sought-after comfort food recipes? This classic chicken and gravy recipe combines tender, juicy chicken with rich, velvety gravy that’s been perfected through generations of home cooking. Whether you’re looking for a hearty weeknight dinner or a crowd-pleasing meal for Sunday gatherings, this chicken and gravy recipe delivers warmth and satisfaction with every bite. Our approach balances traditional techniques with modern shortcuts to create a dish that’s both authentic and accessible for today’s busy home cooks.
Why You’ll Love This Recipe
- Perfect balance of flavors: The combination of herbs, spices, and slow-cooked chicken creates depth without complexity
- Versatile serving options: Works beautifully over mashed potatoes, rice, noodles, or even toast
- Make-ahead friendly: Components can be prepared in advance for quicker weeknight assembly
- Budget-conscious: Uses affordable cuts of chicken and pantry staples
- Crowd-pleaser: Appeals to both picky eaters and culinary enthusiasts
- Customizable: Easy to adjust seasonings and ingredients to suit your family’s preferences
Ingredients List
For the Chicken:
- 4 bone-in, skin-on chicken thighs (about 1.5 lbs) – For moister results than boneless chicken
- 2 bone-in chicken breasts (about 1.5 lbs) – For leaner white meat option
- 2 tablespoons olive oil
- 1 teaspoon kosher salt
- ½ teaspoon freshly ground black pepper
- 1 teaspoon garlic powder
- 1 teaspoon dried thyme (or 1 tablespoon fresh)
- ½ teaspoon paprika
For the Gravy:
- 3 tablespoons unsalted butter
- 1 medium yellow onion, finely diced
- 2 cloves garlic, minced
- 3 tablespoons all-purpose flour
- 2 cups chicken broth (low-sodium preferred)
- ½ cup whole milk or half-and-half
- 1 tablespoon fresh parsley, chopped
- ½ teaspoon dried rosemary (or 1 teaspoon fresh, minced)
- Salt and pepper to taste
Substitution Tips:
- Swap chicken thighs for drumsticks if preferred
- Use boneless pieces for quicker cooking (reduce time by about 10 minutes)
- Replace whole milk with evaporated milk for extra richness
- For dairy-free options, use additional broth instead of milk
- Gluten-free flour can replace all-purpose flour for the gravy
Timing
- Preparation Time: 15 minutes (25% faster if using pre-cut chicken pieces)
- Cooking Time: 45 minutes
- Total Time: 1 hour
- Active Time: 30 minutes (the rest is hands-off cooking)
Step-by-Step Instructions
Step 1: Prepare the Chicken
Preheat your oven to 375°F (190°C). Pat the chicken pieces dry with paper towels – this crucial step ensures crispy skin and better browning. In a small bowl, combine salt, pepper, garlic powder, thyme, and paprika. Rub the chicken pieces thoroughly with olive oil, then season generously with the spice mixture, making sure to get some under the skin for maximum flavor penetration.
Step 2: Sear the Chicken
Heat a large oven-safe skillet or Dutch oven over medium-high heat. Once hot, place the chicken pieces skin-side down and sear for 4-5 minutes until golden brown. Flip and cook for another 2-3 minutes. Work in batches if necessary to avoid overcrowding, which prevents proper browning. Remember: proper browning develops the foundation flavors that will eventually enrich your gravy.
Step 3: Finish Cooking the Chicken
Transfer the skillet with chicken to the preheated oven and roast for about 25-30 minutes, or until the internal temperature reaches 165°F (74°C) for breasts and 175°F (80°C) for thighs. A meat thermometer is invaluable here to ensure perfectly cooked chicken that remains juicy. Once done, remove chicken to a plate and tent loosely with foil to rest.
Step 4: Start the Gravy Base
Return the same skillet to the stovetop over medium heat, keeping all those flavorful browned bits (fond) that have developed. Add butter and allow it to melt. Add diced onions and cook for 3-4 minutes until softened and translucent. Add minced garlic and cook for another 30 seconds until fragrant, being careful not to burn it as this can create bitterness.
Step 5: Create the Roux
Sprinkle the flour over the onion and garlic mixture, stirring constantly to create a paste (roux). Cook this mixture for about 2 minutes, stirring continuously to prevent burning. This step cooks out the raw flour taste and creates the thickening base for your gravy. The roux should turn a light golden brown, indicating the flour has been properly cooked.
Step 6: Develop the Gravy
Gradually whisk in the chicken broth, about ½ cup at a time, ensuring each addition is fully incorporated before adding more. This technique prevents lumps from forming. Once all broth is added, bring the mixture to a gentle simmer and cook for 5-7 minutes, allowing it to thicken. The gravy should coat the back of a spoon but still flow smoothly.
Step 7: Finish and Season the Gravy
Reduce heat to low and stir in the milk or half-and-half, fresh parsley, and rosemary. Simmer gently for another 2-3 minutes to allow flavors to meld. Taste and adjust seasoning with salt and pepper as needed. If the gravy is too thick, thin it with additional broth or milk; if too thin, simmer longer to reduce to desired consistency.
Step 8: Combine and Serve
Return the chicken pieces to the skillet, nestling them into the gravy. Spoon some gravy over the chicken and allow to simmer together for 2-3 minutes. This final step allows the flavors to marry beautifully while gently rewarming the chicken without overcooking it.
Nutritional Information
Per serving (based on 6 servings):
- Calories: 425
- Protein: 35g
- Carbohydrates: 8g
- Fat: 28g (9g saturated)
- Fiber: 1g
- Sodium: 650mg
- Cholesterol: 145mg
- Vitamin A: 12% DV
- Vitamin C: 5% DV
- Calcium: 6% DV
- Iron: 15% DV
Healthier Alternatives for the Recipe
- Reduce fat content: Use skinless chicken pieces and skim milk in the gravy
- Lower carb option: Thicken gravy with 1 tablespoon cornstarch mixed with cold water instead of flour-based roux
- Boost vegetable content: Add 1 cup diced carrots and celery when cooking the onions
- Herb enhancement: Double the fresh herbs for flavor without added sodium
- Dairy-free version: Use chicken broth and 2 tablespoons nutritional yeast for a creamy texture without dairy
- Lower sodium approach: Use salt-free herb blends and reduced-sodium broth (reduces sodium by approximately 40%)
Serving Suggestions
Transform your chicken and gravy into a complete meal with these complementary pairings:
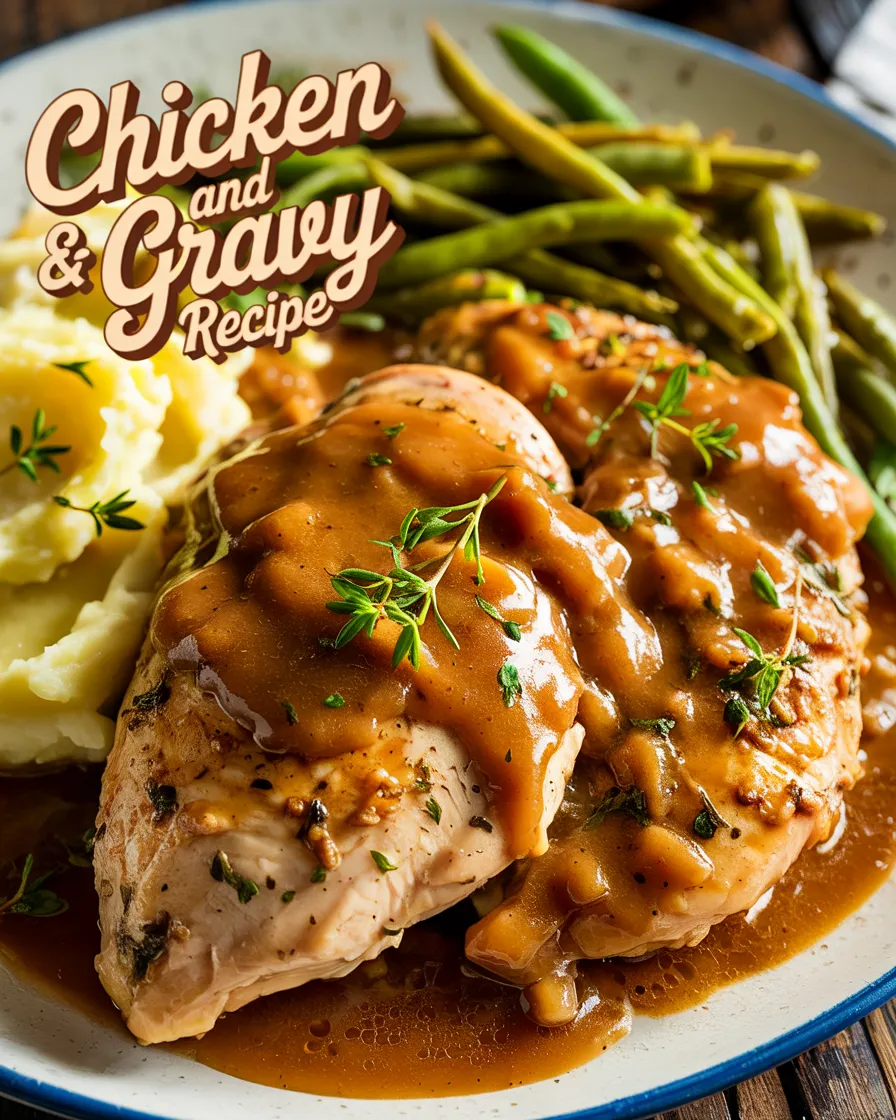
- Serve over creamy mashed potatoes with a side of steamed green beans for a classic comfort food experience
- Pour over fluffy white rice with roasted carrots for a simpler alternative
- Pair with buttered egg noodles and a bright side salad for a balanced meal
- Create open-faced sandwiches by placing chicken and gravy over thick slices of toasted sourdough bread
- For a Southern twist, serve alongside buttermilk biscuits with the gravy spooned generously on top
- Create a restaurant-worthy presentation by adding a sprinkle of fresh herbs and a touch of paprika just before serving
Common Mistakes to Avoid
- Not drying the chicken properly: Moisture prevents proper browning, leading to less flavorful gravy
- Overcrowding the pan: Based on cooking science, chicken pieces need space to sear properly; work in batches if necessary
- Rushing the roux: Research shows cooking flour for a minimum of 2 minutes is essential for eliminating raw flour taste
- Adding liquids too quickly: Incorporate broth gradually to prevent lumps in your gravy
- Under-seasoning: According to culinary experts, gravy typically needs 25% more seasoning than you might initially think
- Neglecting the fond: Those browned bits on the pan bottom contain concentrated flavor compounds essential for rich gravy
- Boiling the gravy: Aggressive boiling can break the emulsion and create a grainy texture
Storing Tips for the Recipe
- Refrigeration: Store leftover chicken and gravy together in an airtight container for up to 3 days. The flavors actually improve overnight as they meld together.
- Freezing option: For longer storage, freeze in portion-sized containers for up to 2 months. Thaw overnight in the refrigerator before reheating.
- Reheating method: Gently reheat on the stovetop over medium-low heat, adding a splash of broth if needed to restore the gravy’s consistency. Microwave reheating works but may require stirring halfway through.
- Meal prep approach: Prepare the chicken and gravy separately up to 2 days ahead, then combine and reheat just before serving for a quick weeknight dinner solution.
- Quality retention: According to food safety experts, keeping leftovers in shallow containers helps them cool faster, preserving both flavor and safety.
This chicken and gravy recipe transforms simple ingredients into a memorable comfort food experience through thoughtful preparation and classic cooking techniques. The combination of perfectly seasoned chicken and silky, flavorful gravy creates a versatile dish that works for everyday family dinners or special occasions. With make-ahead options and storage tips, you can enjoy this hearty meal whenever comfort food cravings strike.
We’d love to hear how this recipe turns out for you! Please leave a comment sharing your experience, any adaptations you made, or questions you might have. Don’t forget to subscribe to our blog for more comforting classics and modern twists on family favorites.
FAQs
Q: Can I use boneless, skinless chicken breasts for this recipe? A: Absolutely! Reduce the oven cooking time to about 18-20 minutes, or until they reach an internal temperature of 165°F. The gravy may have slightly less depth of flavor without the skin and bones, so consider adding an extra pinch of herbs.
Q: Why is my gravy lumpy and how can I fix it? A: Lumps typically form when flour is added too quickly to hot liquid. Fix existing lumps by straining the gravy or blending with an immersion blender. Prevent lumps by creating a proper roux and adding liquid gradually while whisking continuously.
Q: Can I make this recipe dairy-free? A: Yes! Replace butter with olive oil or a plant-based butter, and substitute the milk with additional chicken broth or unsweetened non-dairy milk (oat milk works particularly well for gravies).
Q: How can I make the gravy thicker? A: For a thicker gravy, create a slurry by mixing 1 tablespoon cornstarch with 2 tablespoons cold water, then whisk this into the simmering gravy and cook for an additional 1-2 minutes.
Q: Can I use rotisserie chicken to save time? A: Definitely! Simply shred or chop a rotisserie chicken and add it to the finished gravy. Warm through for about 5 minutes. While you’ll miss the flavor development from cooking raw chicken, this is an excellent time-saving option.
Q: What’s the best way to reheat this dish without drying out the chicken? A: Reheat gently in a covered skillet over medium-low heat, adding a splash of broth if needed. The gravy helps protect the chicken from drying out during reheating.
Q: Can I make this in a slow cooker? A: Yes! Brown the chicken first, then place in a slow cooker. Make the gravy as directed, pour over chicken, and cook on low for 4-5 hours. The chicken will be extra tender, though the skin won’t remain crispy.