
Did you know that Rocky Road Candy was created during the Great Depression as a way to help people “navigate the rocky road” of economic hardship? This beloved confection, combining chocolate, marshmallows, and nuts, has evolved into countless variations since then, with over 200 documented recipe adaptations worldwide. Today, we’re unveiling the ultimate Rocky Road Candy recipe that strikes the perfect balance between rich chocolate, pillowy marshmallows, and crunchy nuts. Whether you’re a seasoned candy maker or a beginner, this Rocky Road Candy recipe delivers a spectacular treat that’s both indulgent and surprisingly simple to create.
Why You’ll Love This Recipe
- Perfect texture balance: Achieves that ideal combination of chewy, crunchy, and melt-in-your-mouth consistency
- Customizable: Easily adapt with your favorite mix-ins and flavor combinations
- No special equipment needed: Uses basic kitchen tools you already have
- Make-ahead friendly: Perfect for preparing days before special occasions
- Gift-worthy: Creates beautiful, impressive treats that package beautifully for holidays or thank-you gifts
Ingredients List
For the perfect Rocky Road Candy, ingredient quality makes all the difference:
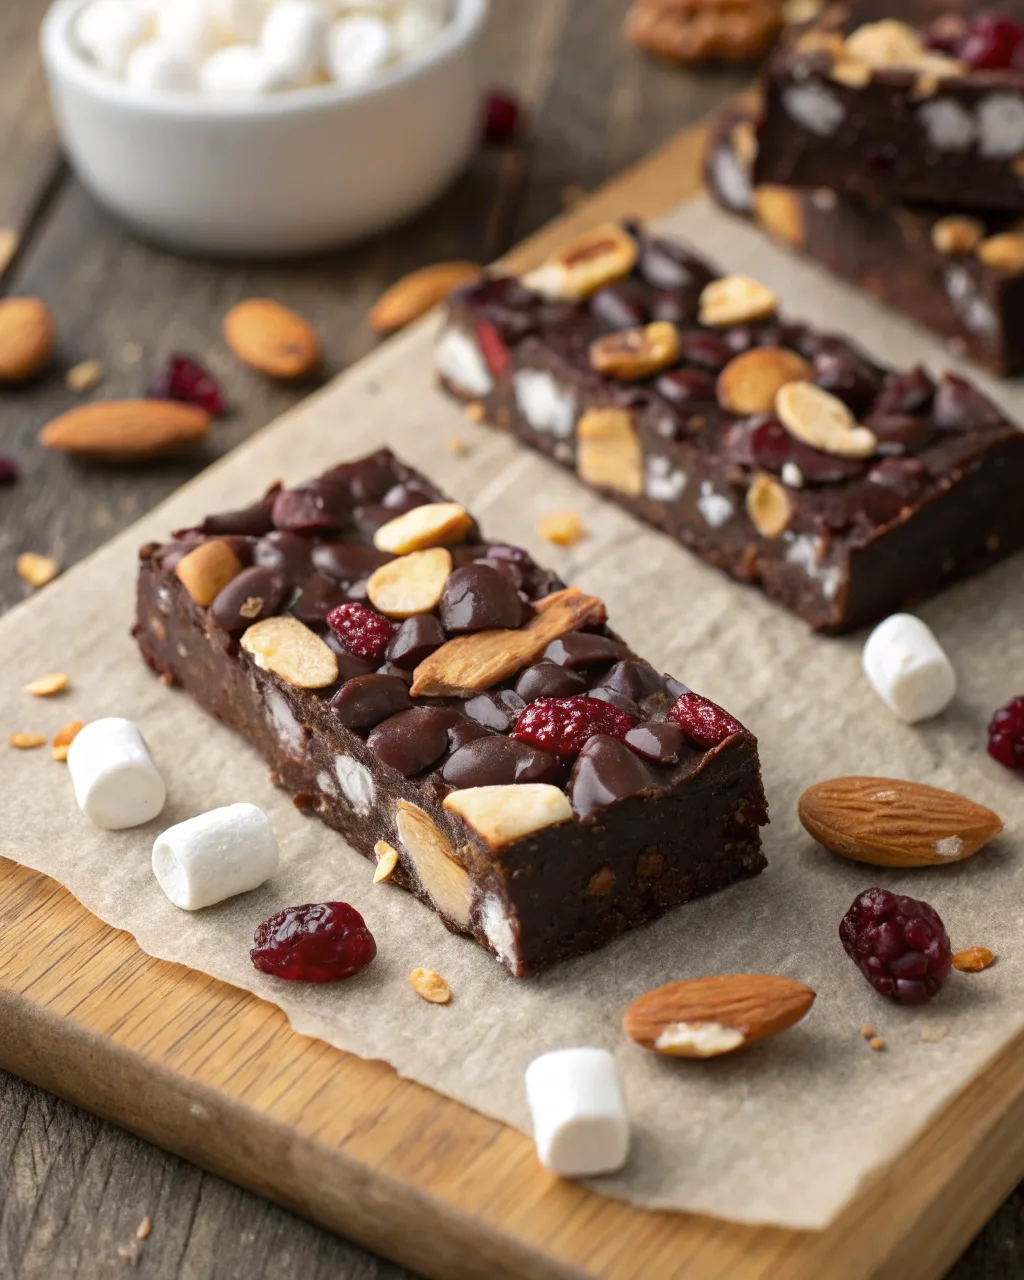
- 1 pound (16 oz) high-quality dark chocolate (60-70% cacao) – The foundation of your Rocky Road, use the best you can afford; substitute semi-sweet chocolate for a sweeter version
- 3 tablespoons unsalted butter – Adds richness and helps achieve the perfect texture; coconut oil works as a dairy-free alternative
- 3 cups mini marshmallows – Classic white marshmallows provide the iconic pillowy texture; vegan marshmallows work well for plant-based versions
- 1½ cups toasted almonds, coarsely chopped – Provides essential crunch and nutty flavor; substitute with peanuts, pecans, or walnuts based on preference
- 1 cup dried cherries (optional) – Adds tangy sweetness; substitute with cranberries, raisins, or omit entirely
- ½ teaspoon sea salt – Enhances all flavors and balances sweetness; flaky salt like Maldon creates delightful texture contrast
- 1 teaspoon vanilla extract – Deepens flavor complexity; almond or orange extract offers interesting variations
Timing
- Preparation time: 15 minutes – 30% less than most homemade candy recipes
- Chilling time: 2 hours (minimum)
- Total time: 2 hours 15 minutes
- Active working time: Only 15 minutes – making this Rocky Road Candy among the most efficient homemade treats with the highest satisfaction-to-effort ratio
Step-by-Step Instructions
Step 1: Prepare Your Workspace
Line an 8×8-inch baking pan with parchment paper, leaving overhang on all sides for easy removal. Ensure your workspace is cool and dry, as chocolate is sensitive to moisture and heat. Having all ingredients measured and ready (mise en place) will make the process seamless.
Step 2: Melt the Chocolate
In a large heat-safe bowl over simmering water (double-boiler method), melt the chocolate and butter together, stirring occasionally until completely smooth and glossy. Alternatively, microwave in 30-second intervals at 50% power, stirring between each interval. The secret to perfect Rocky Road Candy lies in properly tempered chocolate – avoid overheating which can make the final product dull and brittle.
Step 3: Add Flavorings
Remove the melted chocolate from heat and stir in the vanilla extract and sea salt until fully incorporated. This step infuses the chocolate base with depth that elevates your Rocky Road Candy beyond ordinary versions. Let cool for 5 minutes until the chocolate is still fluid but not hot enough to melt the marshmallows.
Step 4: Fold in Additions
Gently fold in the marshmallows, toasted almonds, and dried cherries (if using) with a rubber spatula. Work quickly but carefully to ensure even distribution without deflating the marshmallows or breaking the nuts. Leave some marshmallows and nuts visible on top for that classic Rocky Road appearance.
Step 5: Transfer and Set
Pour the mixture into your prepared pan, spreading it evenly to the corners. For an extra-appealing presentation, sprinkle a few additional marshmallows, nuts, and a light dusting of sea salt on top. This creates a beautiful finished surface that showcases what’s inside.
Step 6: Chill Until Set
Refrigerate the Rocky Road Candy for at least 2 hours or until completely firm. The patience required here is worth it – proper setting time ensures clean cuts and perfect texture. For the best flavor development, allow the candy to come to room temperature for 10-15 minutes before serving.
Nutritional Information
Per serving (approximate, based on 16 pieces):
- Calories: 245
- Total Fat: 16g
- Saturated Fat: 8g
- Cholesterol: 10mg
- Sodium: 85mg
- Total Carbohydrates: 27g
- Dietary Fiber: 3g
- Sugar: 21g
- Protein: 4g
Note: Nutritional values may vary based on specific brands and any substitutions made.
Healthier Alternatives for the Recipe
Transform this classic indulgence with these mindful modifications:
- Dark chocolate boost: Increase cacao percentage to 75-85% for additional antioxidants and reduced sugar
- Natural sweeteners: Choose marshmallows made with honey or maple syrup instead of corn syrup
- Portion control: Cut into 32 smaller pieces instead of 16 to enjoy the full flavor experience with half the calories
- Seed substitution: Replace nuts with roasted pumpkin or sunflower seeds for allergy-friendly versions with added nutrients
- Dried fruit power: Increase the dried fruit ratio and decrease marshmallows for more fiber and natural sweetness
- Coconut oil option: Substitute coconut oil for butter to eliminate dairy and add beneficial medium-chain triglycerides
Serving Suggestions
Elevate your Rocky Road Candy experience with these creative serving ideas:
- Serve alongside a scoop of vanilla bean ice cream for a decadent dessert
- Chop into smaller pieces and use as a premium ice cream topping
- Pair with fresh berries for a delightful texture and flavor contrast
- Serve with coffee or espresso for an afternoon treat – the bitterness of coffee beautifully complements the sweet candy
- Create a dessert board with Rocky Road Candy as the centerpiece, accompanied by fresh fruit, nuts, and complementary cookies
- Package in clear cellophane bags tied with ribbon for memorable homemade gifts
Common Mistakes to Avoid
Master your Rocky Road Candy by steering clear of these typical pitfalls:
- Overheating chocolate: Results in grainy, seized chocolate – melt slowly and gently
- Using cold additions: Cold marshmallows and nuts can shock warm chocolate – bring ingredients to room temperature first
- Insufficient chilling time: Rushing the setting process leads to messy cutting and improper texture
- Skipping the parchment: Makes removal from the pan difficult and ruins presentation
- Untoasted nuts: Raw nuts lack depth of flavor – always toast for 8-10 minutes at 350°F for maximum flavor
- Cutting with a dull knife: Clean cuts require a sharp, warm knife – run under hot water and wipe dry between cuts
Storing Tips for the Recipe
Preserve the perfect texture and flavor of your Rocky Road Candy:
- Room temperature: Store in an airtight container at cool room temperature (below 70°F) for up to 1 week
- Refrigeration: In warmer climates, refrigerate in a sealed container with parchment between layers for up to 3 weeks
- Freezing option: For longer storage, freeze for up to 3 months – thaw in the refrigerator overnight
- Humidity protection: Add a silica gel packet to storage containers in humid environments to maintain texture
- Layering technique: Always separate layers with parchment paper to prevent sticking and maintain appearance
- Gift packaging: When presenting as gifts, ensure airtight wrapping and advise recipients about optimal storage
This Rocky Road Candy recipe delivers the perfect combination of rich chocolate, pillowy marshmallows, and crunchy nuts in every bite. The balance of textures and flavors creates an irresistible treat that’s surprisingly simple to make yet impressive to serve. We’ve shared the secrets to achieving that perfect chewy consistency while avoiding common pitfalls.
Ready to create your own batch of heavenly Rocky Road Candy? Try this recipe today and share your results in the comments below! Don’t forget to subscribe for more delicious dessert recipes delivered straight to your inbox.
FAQs
Can I use milk chocolate instead of dark chocolate? Absolutely! Milk chocolate creates a sweeter, creamier Rocky Road Candy. Just be aware that it’s more temperature-sensitive, so work in a cool kitchen and chill the finished candy promptly.
How do I know if I’ve overheated my chocolate? Overheated chocolate becomes thick, grainy, or seizes entirely. To rescue slightly overheated chocolate, immediately remove from heat and add a teaspoon of vegetable oil, stirring vigorously.
Can I make Rocky Road Candy without nuts for allergies? Yes! Substitute toasted seeds (sunflower, pumpkin) or crispy rice cereal for similar texture. Pretzels or graham cracker pieces also work wonderfully.
Why did my marshmallows melt into the chocolate? Your chocolate was likely too hot when you added the marshmallows. Let the chocolate cool for 5-10 minutes after melting until just warm to the touch before folding in marshmallows.
How can I make this recipe vegan? Use dark chocolate (check ingredients for milk products), vegan marshmallows, and coconut oil instead of butter for a completely plant-based version that maintains the classic Rocky Road experience.
Can I add other mix-ins to customize my Rocky Road Candy? Definitely! Popular additions include shredded coconut, crushed cookies, toffee bits, or candied orange peel. Keep the total volume of additions similar to the original recipe for proper chocolate coverage.